Posts

Showing posts from 2019

3 Neat Uses for Peel & Stick Tiles

Image
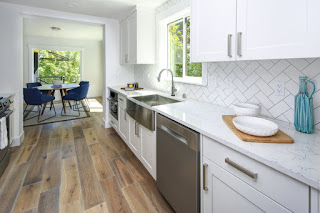
3 Neat Uses for Peel & Stick Tiles Whether you are renting and unable to make permanent changes to your house, or you own and a full remodel just isn’t in the budget right now, peel & stick tiles are an affordable, versatile way to make a room feel updated and new. These tiles only require a cutting mat, a ruler, and an X-Acto knife and are easy to remove without causing any damage. Many of the peel & stick tile company have easy-to-follow instructional videos which show you how to measure, cut, peel, and stick your new tile. Here are 3 ways you can incorporate this temporary tile into your home! 1. Upgrade your backsplash. Whether it is your kitchen or bathroom, old backsplash can prevent you from fulfilling your styling vision. It can also be a real eyesore depending on how old it is.  These peel & stick tiles can give those rooms a complete makeover with ease. Just cut the tile to fit around your outlets and press to stick! 2. Customize

Want to Hide Your Litter Box?

Image
Want to Hide Your Litter Box? Create A Kitty Corner! What You’ll Need: Side table Twisted jute rope Short tension rod Two window valances 1. Using the jute rope, create a scratching post by wrapping the rope around the legs of your side table. This will protect the legs and offer entertainment to your furry friends. 2. Measure the height and width of your table and cut your window valances to match the size. Once you’ve done that, you can put the valences on a tension rod and place the rod between the legs. 3. Place your litter box under the table behind the valences, and show your feline family member where his or her litter box has been moved to! Now your cat(s) can go about their business without your visitors watching.

Staging Tips for Homeowners

Image

How to Sell a Home When You Have a Home to Sell

Image
Mary Huffman explains your options when you want to buy but have a house to sell Watch video below.
Image
DIY SHIPLAP FOR $40   Thanks to Chip & Joanna Gaines, shiplap is filling homes across the country, and for good reason. Shiplap can give you a beautiful feature wall without having to choose an accent color you may not be crazy about in a few months. If done wisely, it doesn’t have to be expensive either. Here is a guide to create your own shiplap without breaking the bank. What You’ll Need: Nail Gun & Nails Table Saw* Compound Miter Saw* Stud Finder Underlayment Plywood Construction Adhesive 1/8 Inch Tile Spacers Spackling Paste 250 Grit Sandpaper Paint (With Primer Included) * Your local home improvement store where you purchase your plywood can typically cut your boards into planks if you do not have these tools at home. Make sure your boards will collectively be long enough to fit the wall you plan to shiplap. Step 1: Prep Your Planks Measure the wall you plan to shiplap and make sure you get enough plywood to cover the wall. You get to decide how wid

What is "Seller Assist"

Image
Mary Huffman of Howard Hanna Explains "Seller Assist" 

5878 Forest Crossing Mary Huffman

Image

What is radon by Erie, PA Realtor Mary Huffman

Real Estate Education Video #1

Topic: Verbal agreement with seller but they sold to someone else!   Now scheduling buyer & seller consultations.  If you are planning a move in 2019, please give Mary Huffman a try.  She can be reached at Howard Hanna, Erie, PA 814-835-1200 or best to call her on her cell 814-490-6698. PA Real Estate License # RS202818L